A banana split is one of those desserts that seems simple until you actually try to make it at home. The difference between a mediocre one and a truly great one comes down to technique and ingredient quality.
We at Laurie’s Grill have seen plenty of homemade banana splits fall short because people skip the fundamentals. This guide walks you through exactly what it takes to build one that rivals any ice cream parlor.
What Ingredients Make the Biggest Difference
Ice Cream Sets the Foundation
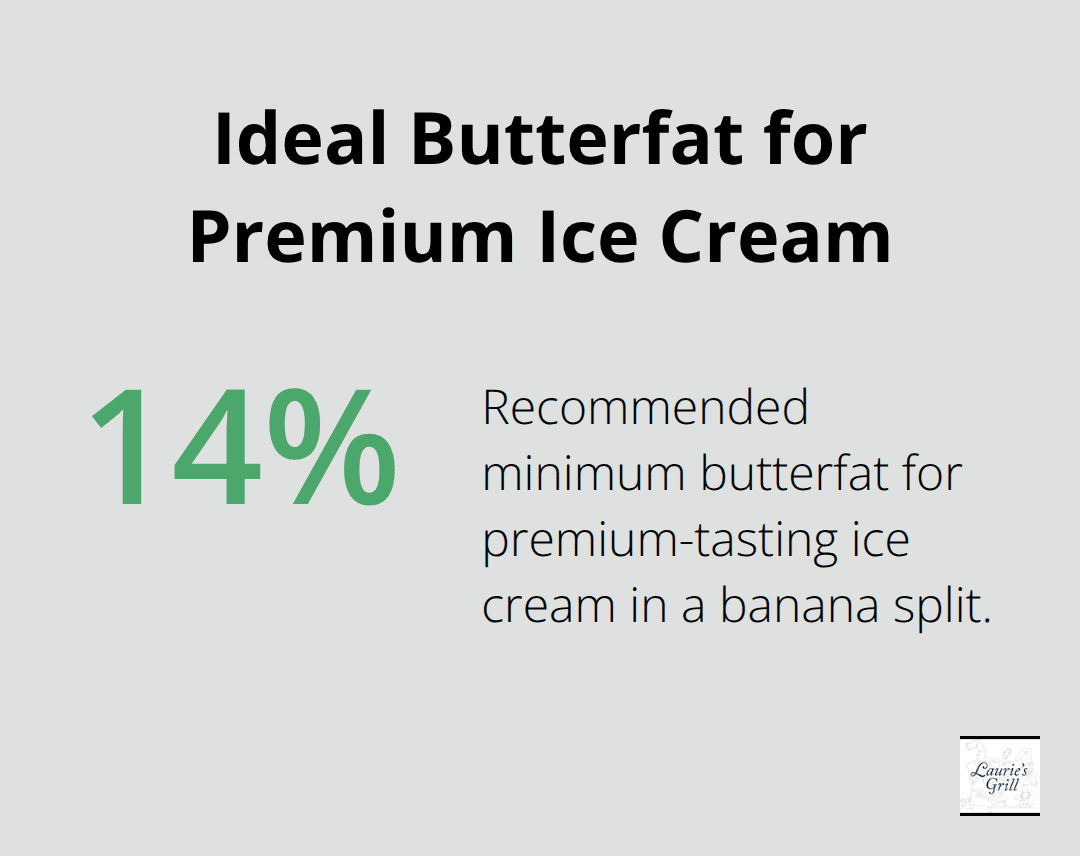
Ice cream quality matters more than most home cooks realize. The standard vanilla, chocolate, and strawberry trio works because these flavors complement each other, but the fat content and ingredient list determine whether your banana split tastes premium or pedestrian. Look for ice cream with at least 14% butterfat and real vanilla extract rather than vanillin. Häagen-Dazs and Ben & Jerry’s both deliver consistent results, though local creameries often outperform national brands if you have access to one. The difference between cheap and quality ice cream shows up immediately once the scoops hit the warm fruit and sauces, so this is where skimping backfires fastest.
The Banana Requires Precision
A ripe banana serves as your anchor, not an afterthought. Choose one that’s yellow with minimal brown spots, which means it has peak sweetness without the mushiness that comes with overripeness. Slice it lengthwise just before assembly to prevent browning and maintain structural integrity for holding the scoops. Frozen fruit is just as nutritious as fresh fruit and may be higher in vitamins C and E. Strawberries should be ripe and firm, not soft or watery. If you’re adding crushed pineapple, fresh works better than canned versions packed in heavy syrup, though canned pineapple in its own juice remains acceptable.
Sauces and Toppings Demand Attention
Sauces determine the final flavor profile, so quality here directly impacts the entire dessert. Chocolate syrup varies wildly in quality, and cheap versions taste waxy rather than rich. Make your own hot fudge sauce by melting 6 ounces of semi-sweet chocolate with 4 tablespoons of butter and 1 tablespoon of corn syrup-this takes 5 minutes and costs less than $3. Strawberry and pineapple sauces benefit from fresh fruit, though store-bought versions work if they contain actual fruit rather than artificial flavoring.
Whipped cream should be made fresh from heavy cream, not the canned or pre-made versions that contain stabilizers and taste flat. Whip 1 cup of heavy cream with 1 tablespoon of powdered sugar to stiff peaks, which takes 3 minutes with a hand mixer. The nuts matter too. Crushed walnuts provide the classic texture, though toasted pecans or peanuts add different character. Toast raw nuts in a 350-degree oven for 8 minutes to intensify their flavor before chopping. Luxardo maraschino cherries cost more than standard bright-red versions but taste less artificial and won’t overpower the other flavors with cloying sweetness. This single swap elevates the entire presentation and sets the stage for proper assembly.
How to Assemble Your Banana Split Without Melting Everything
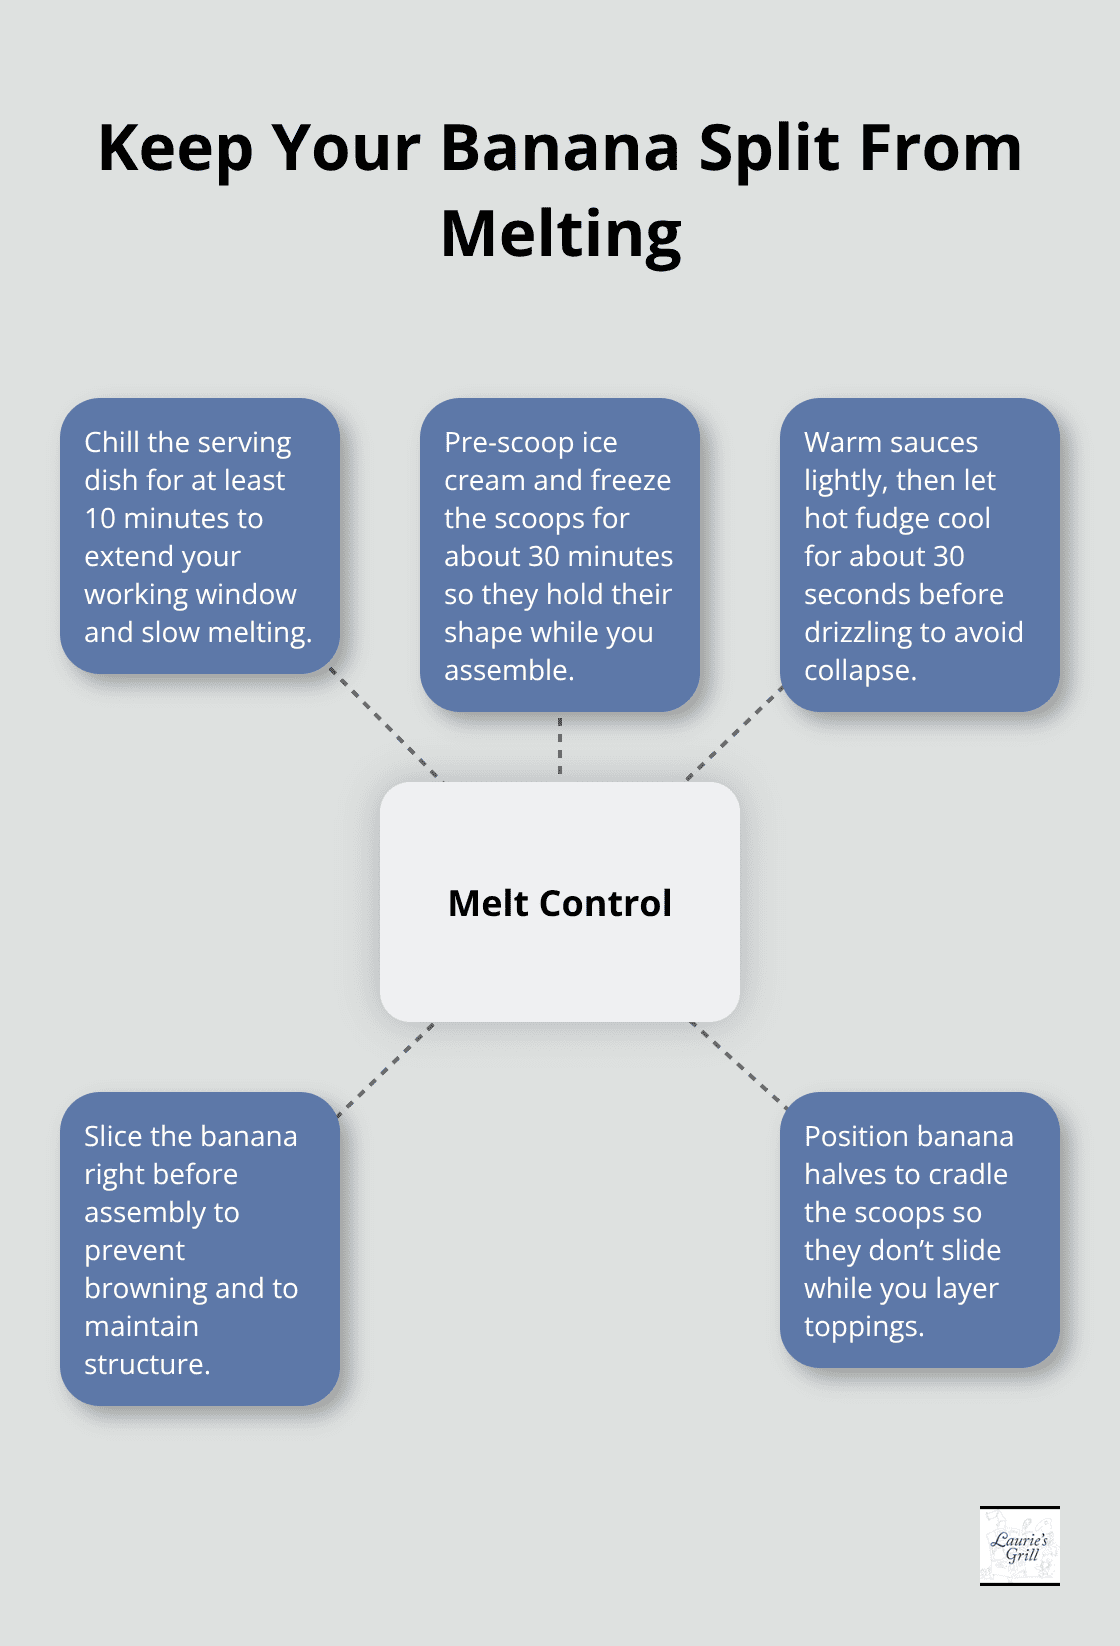
The assembly phase separates people who make passable banana splits from those who create restaurant-quality ones. Speed matters more than you’d think because ice cream loses structural integrity fast once it contacts warm fruit and sauces. Chill your banana split dish in the freezer for at least 10 minutes before you begin. This single step extends your working window by several minutes and prevents the ice cream from softening faster than you can apply toppings. Slice your banana lengthwise right before assembly, not earlier.
Peel it after slicing to make the pieces easier to handle and to prevent browning that happens when exposed flesh sits for more than a minute or two. Position the banana halves along the sides of your dish with the flat edge facing inward, creating a natural channel for the ice cream scoops. This positioning isn’t decorative-it actually keeps the scoops from sliding around as you work and gives you a stable platform for layering.
The Right Scoop Placement Changes Everything
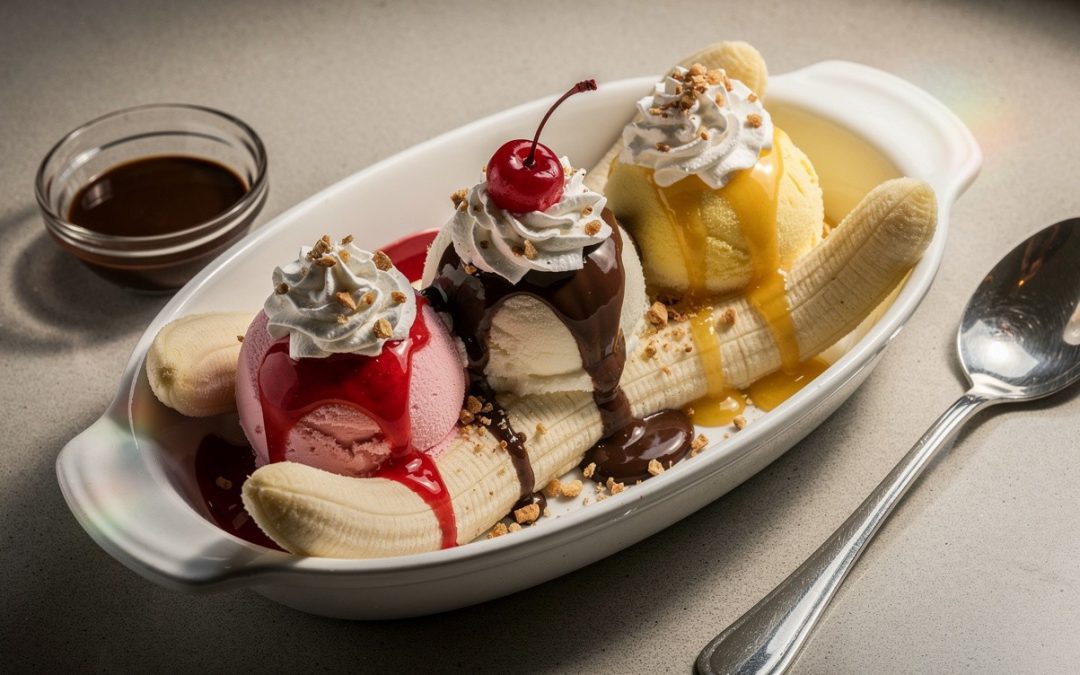
Place your three ice cream scoops in a single row between the banana halves, spacing them about an inch apart. Vanilla sits on the left where it will receive pineapple sauce, chocolate in the middle for hot fudge, and strawberry on the right for strawberry sauce. This arrangement ensures each scoop gets its designated topping without flavors bleeding together. Use a sturdy ice cream scoop with a release mechanism-a KitchenAid or similar model works far better than cheap scoops that require you to dig and twist. Soften your ice cream slightly before scooping by letting it sit at room temperature for 3 to 5 minutes. This prevents you from applying excessive pressure that flattens the scoop and creates an uneven surface for toppings. Pre-scoop your ice cream onto parchment paper and freeze the scoops for 30 minutes before assembly if you’re making multiple banana splits, which keeps them perfectly shaped while you work through your batch.
Sauce Application and Final Topping Strategy
Apply sauces in thin, deliberate drizzles rather than pouring them on heavily. Thick sauce pools at the bottom of the dish instead of coating the ice cream, and excess weight accelerates melting. A single tablespoon of hot fudge over the chocolate scoop is sufficient, though it should be warm enough to create a thin, glossy coating. Let hot fudge cool for 30 seconds before applying it to prevent the ice cream from collapsing. Fresh strawberries work better than strawberry sauce because they add texture without moisture overload, but if you use sauce, strain it first to remove excess liquid. Apply whipped cream last, right before serving. Pipe it onto each scoop using a pastry bag with a medium tip, creating a small peak on top of each mound. This presentation looks professional and keeps the cream from melting into the ice cream. Top each whipped cream peak with a single cherry, not multiple cherries stacked on top of each other. Crushed nuts go between the scoops and banana rather than on top of the whipped cream, where they’ll slide off. Toast your nuts immediately before assembly to maximize their crunch and warm flavor impact.
What Happens When You Rush the Process
Most home cooks fail at banana splits because they underestimate how quickly ice cream melts once assembly starts. The moment you place cold scoops into a room-temperature dish, heat transfer begins. Every second counts, which is why pre-chilling your dish and pre-scooping your ice cream matter so much. Warm sauces accelerate this process dramatically, so apply them strategically and in small amounts. The difference between a banana split that holds its shape for five minutes and one that collapses into soup comes down to these small decisions made during assembly.
Your banana split is now structurally sound and visually impressive, but the real test comes when you serve it. How you present and eat this dessert determines whether it delivers the experience you’ve worked to create.
Common Mistakes That Ruin a Banana Split
Temperature Control Determines Success
The moment your ice cream hits a warm dish, you lose the race against physics. Most home cooks assemble their banana split at room temperature, which means the scoops start collapsing before you finish applying toppings. A chilled dish extends your working window from roughly two minutes to five or six minutes, but many people skip this step entirely. The temperature difference between a frozen dish and room temperature is the difference between a banana split that holds its shape and one that turns into a puddle.
Even if you chill your dish, applying warm sauces immediately after scooping accelerates melting dramatically. Let hot fudge cool for 30 seconds on the counter before drizzling it, and avoid pouring room-temperature strawberry sauce directly onto cold ice cream. The thermal shock causes the outer layer to soften faster than you’d expect. If you’re making multiple banana splits for guests, pre-scoop your ice cream onto parchment paper and keep the scoops in the freezer until you’re ready to assemble each plate. This approach gives you 15 to 20 minutes of working time per banana split instead of two minutes, which separates rushed desserts from polished ones.
Toppings Require Restraint, Not Excess
Overloading with toppings kills a banana split faster than any other mistake, and it happens because people confuse abundance with quality. More sauce doesn’t mean better flavor-it means a soggy bottom and washed-out scoops. A single tablespoon of hot fudge per chocolate scoop is sufficient. A tablespoon of fresh strawberries beats a quarter cup of strawberry sauce every time.
Whipped cream should be a thin peak on top of each scoop, not a mountain that obscures the ice cream underneath. Crushed nuts work best when scattered between the scoops and banana halves, not piled on top where they immediately slide off and get lost in the melted ice cream pooling at the bottom. Each topping serves a purpose-texture, flavor contrast, visual appeal-but only when applied with intention rather than abandon.
Ingredient Quality Cannot Be Faked
The final mistake people make is accepting low-quality ingredients as acceptable. Cheap vanilla ice cream tastes thin and artificial, and no technique fixes that. Canned whipped cream contains stabilizers that prevent it from ever feeling fresh. Bright-red maraschino cherries taste like sugar and food coloring, not actual fruit.
These aren’t small details; they’re the foundation of whether your banana split tastes homemade or like a sad diner approximation. Spending an extra two dollars on Luxardo cherries and real whipped cream transforms the entire experience from forgettable to memorable. Quality ice cream with at least 14% butterfat, fresh heavy cream whipped to stiff peaks, and premium cherries create a dessert that justifies the effort you’ve invested in proper assembly and technique.

Final Thoughts
A perfect banana split at home requires three non-negotiable principles: ingredient quality, assembly speed, and intentional restraint. You now understand why a chilled dish matters, why pre-scooping saves your dessert, and why Luxardo cherries beat artificial alternatives every time. These techniques aren’t complicated, but they separate forgettable banana splits from ones people actually remember eating.
Customization transforms your banana split into something uniquely yours. The vanilla-chocolate-strawberry foundation works because it’s proven, but swapping in salted caramel sauce instead of hot fudge, using toasted pecans instead of walnuts, or adding crushed Oreo cookies between the scoops creates a dessert that reflects your taste. Fresh berries, homemade sauces, and premium ice cream from local creameries elevate the experience beyond what mass-produced versions deliver.
Serve your banana split immediately and eat it right away-this dessert doesn’t improve sitting on the counter while people chat. Visit Laurie’s Grill in Bend, Oregon if you want to enjoy a professionally made banana split, or perfect your technique at home using the principles we’ve covered. Either way, quality ingredients and genuine care transform a simple dessert into something worth savoring.
Recent Comments