Apple pie represents more than just a dessert-it’s a connection to family history and kitchen traditions that matter.
At Laurie’s Grill, we believe the best recipes are the ones that get passed down and baked again and again. This guide walks you through making an authentic apple pie from scratch, with practical steps for selecting apples, building your crust, and nailing the bake every time.
Building Your Pie from Quality Ingredients
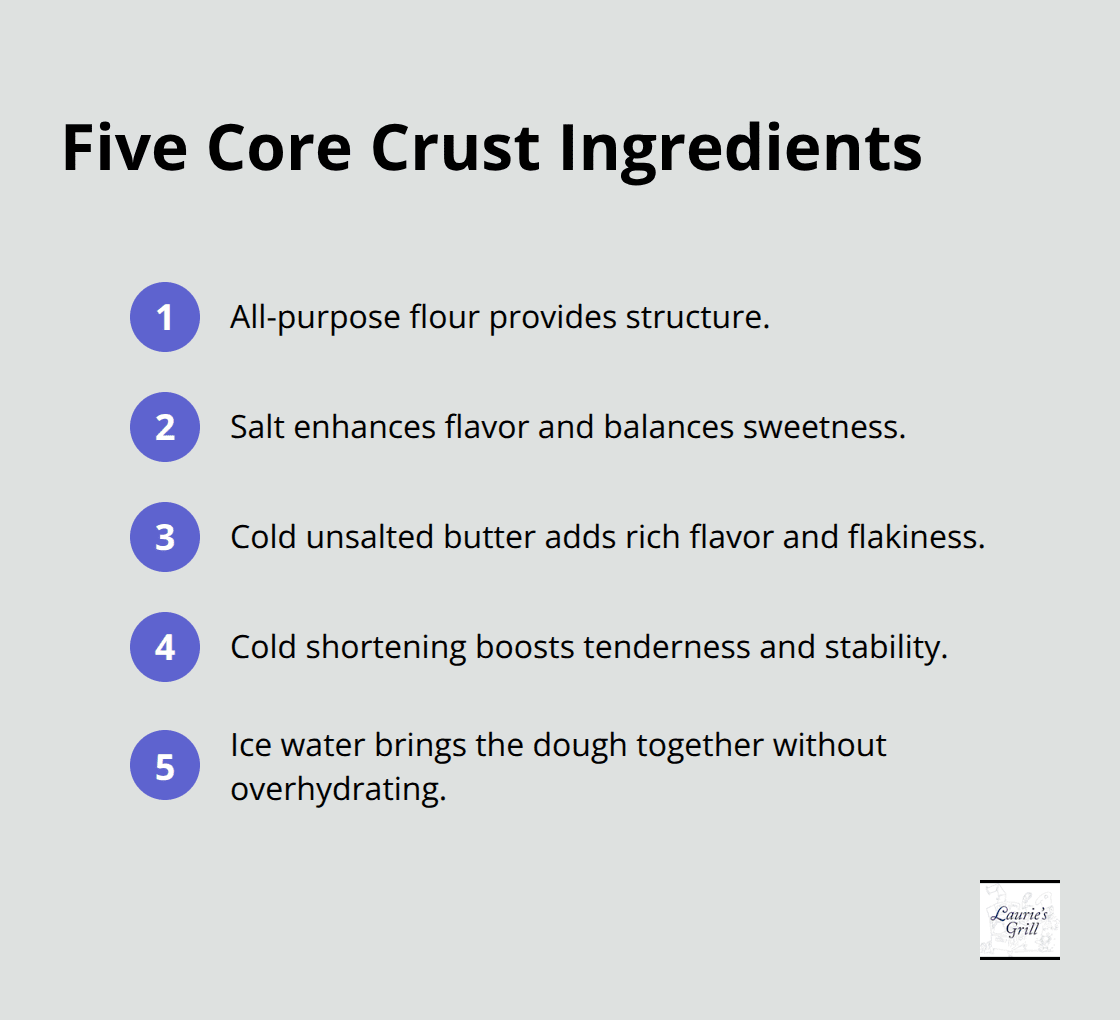
The foundation of a traditional apple pie rests on five core ingredients for the crust: all-purpose flour, salt, a blend of cold butter and shortening, and ice water. King Arthur Baking Company recommends the butter-shortening combination because it delivers both flavor and a crisp, reliable edge that holds up against wet fillings. Measure your flour accurately using the spoon-and-level method to avoid overpacking, which makes the crust tough and dense. Start with 2.5 cups flour, 0.5 teaspoon salt, 1 cup very cold unsalted butter, and 6 to 8 tablespoons of ice water. The secret lies in coating a portion of your flour with cold butter before adding the rest-this creates what bakers call a butter raincoat that reduces gluten formation and yields light, tender layers. Keep your water to a minimum and add it one tablespoon at a time until the dough just comes together.
Form two discs, wrap them tightly, and refrigerate for at least one hour before rolling. This crust works for any pie, but it proves particularly sturdy against juicy apple fillings.
Choosing Apples That Hold Their Shape
Apple selection determines whether your pie has depth or falls flat. For a three-variety blend that creates real complexity, use 50% Golden Delicious, 30 percent Northern Spy or Braeburn, and 20 percent for a supporting variety. Golden Delicious provides buttery richness and slices that soften nicely without turning to mush.
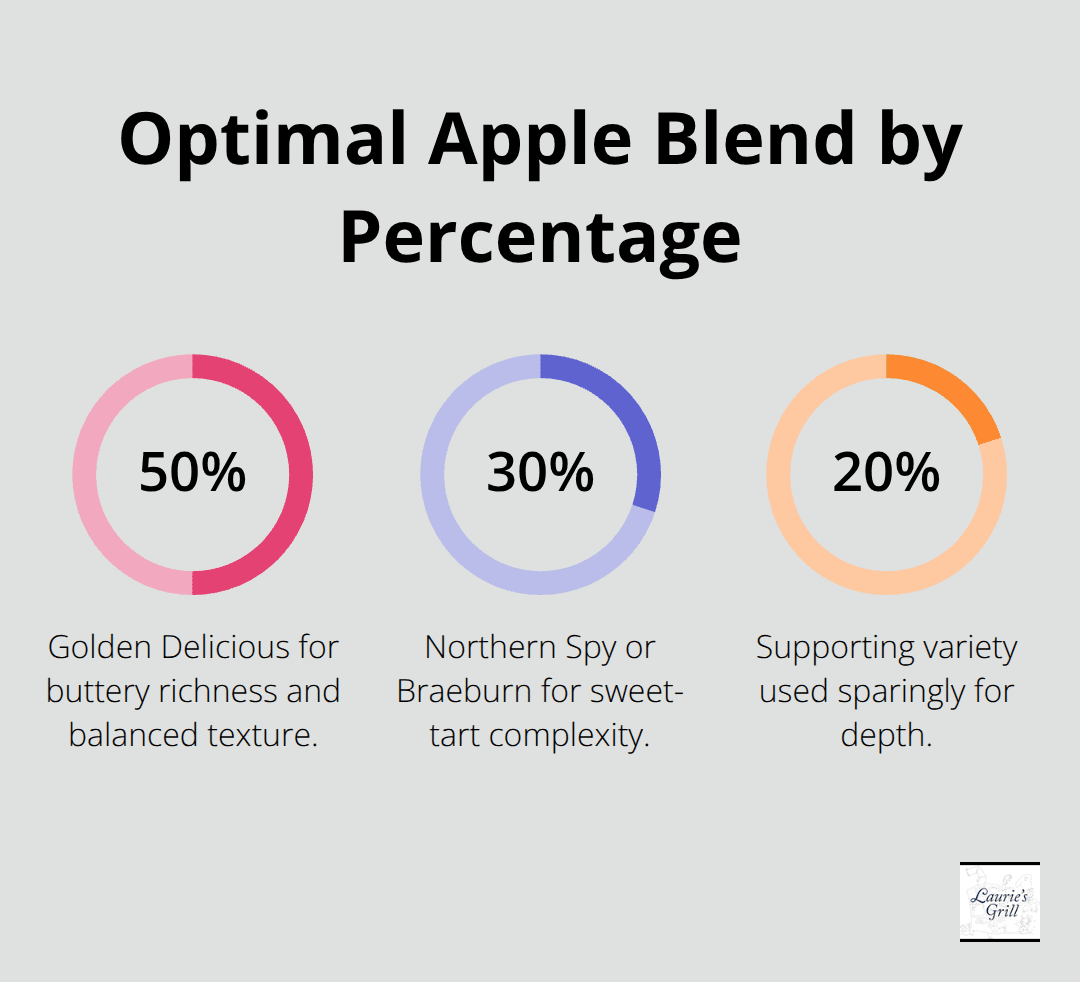
Northern Spy delivers an excellent sweet-tart balance ideal for holiday pies, especially common in the Northeast and Midwest. McIntosh becomes sauce-like when baked, so use it sparingly as a supporting apple to add cider-like depth rather than as your main variety. Avoid Gala, Red Delicious, and modern storage-house Granny Smith-they bake into grainy, mealy textures that undermine your pie’s structure. Slice apples into uniform thickness to ensure even cooking. An apple peeler-corer-slicer speeds prep and reduces wrist strain while producing evenly sized pieces.
Preparing Your Filling for Texture and Flavor
Macerate your sliced apples with lemon juice and sugar, then let them rest for one hour to release their natural juices. Simmer these released juices down to a syrup and drizzle it back into the filling-this pre-thickening approach prevents a runny pie while keeping flavors concentrated. Mix your dry ingredients thoroughly before adding them to the apples: use high-quality Vietnamese cinnamon for deeper aroma, add a touch of boiled cider for concentrated sweetness, and choose your thickener carefully. Cornstarch works reliably for most home bakers, though King Arthur offers guidance on tapioca and ClearJel for different results. Distribute these dry ingredients evenly by shaking them into the apples rather than dumping them, which prevents hot spots of spice or thickener. Add small bits of cold butter or a touch of heavy cream to the filling to deepen flavor and improve how the juices bind. Chill your assembled pie for at least 30 minutes before baking-this helps prevent the crust from shrinking during the initial heat, setting you up for the baking process that transforms these quality ingredients into a finished pie.
Baking Your Pie to Golden Perfection
Preparing the Oven and Pie for Baking
Your assembled pie needs a 30-minute chill before entering the oven-this final rest prevents the crust from shrinking and keeps your layers intact. Preheat your oven to 400°F and place a baking sheet lined with parchment on the lowest rack. This catches any bubbling juices that escape, keeping your oven clean and preventing soggy bottoms. Set your pie directly on the hot baking sheet, not on a separate rack above it.
Managing Heat and Time for Even Baking
Bake for 20 minutes at 400°F, then reduce the heat to 375°F for another 25 to 35 minutes. The pie reaches doneness when the top crust turns deep golden brown and you see juices bubbling through any vent slits. If the edges brown too quickly, cover them loosely with foil around the 15-minute mark. The entire bake typically takes 45 to 55 minutes depending on your oven’s quirks and how thickly you sliced your apples.
Finishing Touches Before the Oven
Before the final 10 minutes, brush the top crust with milk or cream and sprinkle it with a mixture of cinnamon sugar and sparkling sugar for crunch and aroma. This step transforms a good crust into one that catches light and delivers texture with every bite.
Cooling and the Critical Resting Period
Cooling matters as much as baking. Let your pie rest on a wire rack for at least four hours before slicing-this allows the starch and pectin to set properly, preventing a soupy filling that collapses when you cut it. Cutting into a warm pie releases steam and breaks down the thickened juices, leaving you with a runny mess. If you want to serve it warm, reheat individual slices in a 350°F oven for five minutes rather than eating the pie straight from the cooling rack.
Understanding Your Crust’s Success
A well-made crust browns beautifully because of your butter-shortening blend and proper technique, remaining sturdy enough to hold juicy fillings without becoming soggy. The visual cue matters: when the crust reaches a deep golden brown rather than pale or light tan, you know the butter has emulsified properly and the structure has set. Your kitchen will smell like cinnamon and caramelized apples-that’s your signal the chemical reactions inside have created real flavor depth, not just surface browning. With your pie cooled and ready, the next step involves deciding how to present this homemade treasure to your family and guests.
How to Serve and Store Your Apple Pie
Slicing and Serving Your Pie
Slice your pie cleanly by dipping your knife in hot water and wiping it between cuts-this prevents the filling from dragging and tearing the crust. Serve slices at room temperature rather than chilled, as cold pie masks the cinnamon and caramelized apple flavors you worked to develop. A Vermont tradition pairs sharp cheddar cheese alongside warm slices, and this approach genuinely works because the salt and tang cut through the sweetness and complement the spice notes.
Choosing the Right Accompaniments
Vanilla ice cream remains the safest pairing, but it dulls complexity when applied too generously-use a modest scoop that melts slightly into the warm filling rather than overwhelming it. Whipped cream works better than ice cream if your pie sits at room temperature, and custard sauce adds richness without the temperature shock that ice cream creates. The right accompaniment honors the effort you invested in building this dessert from quality ingredients.
Keeping Your Pie Fresh at Home
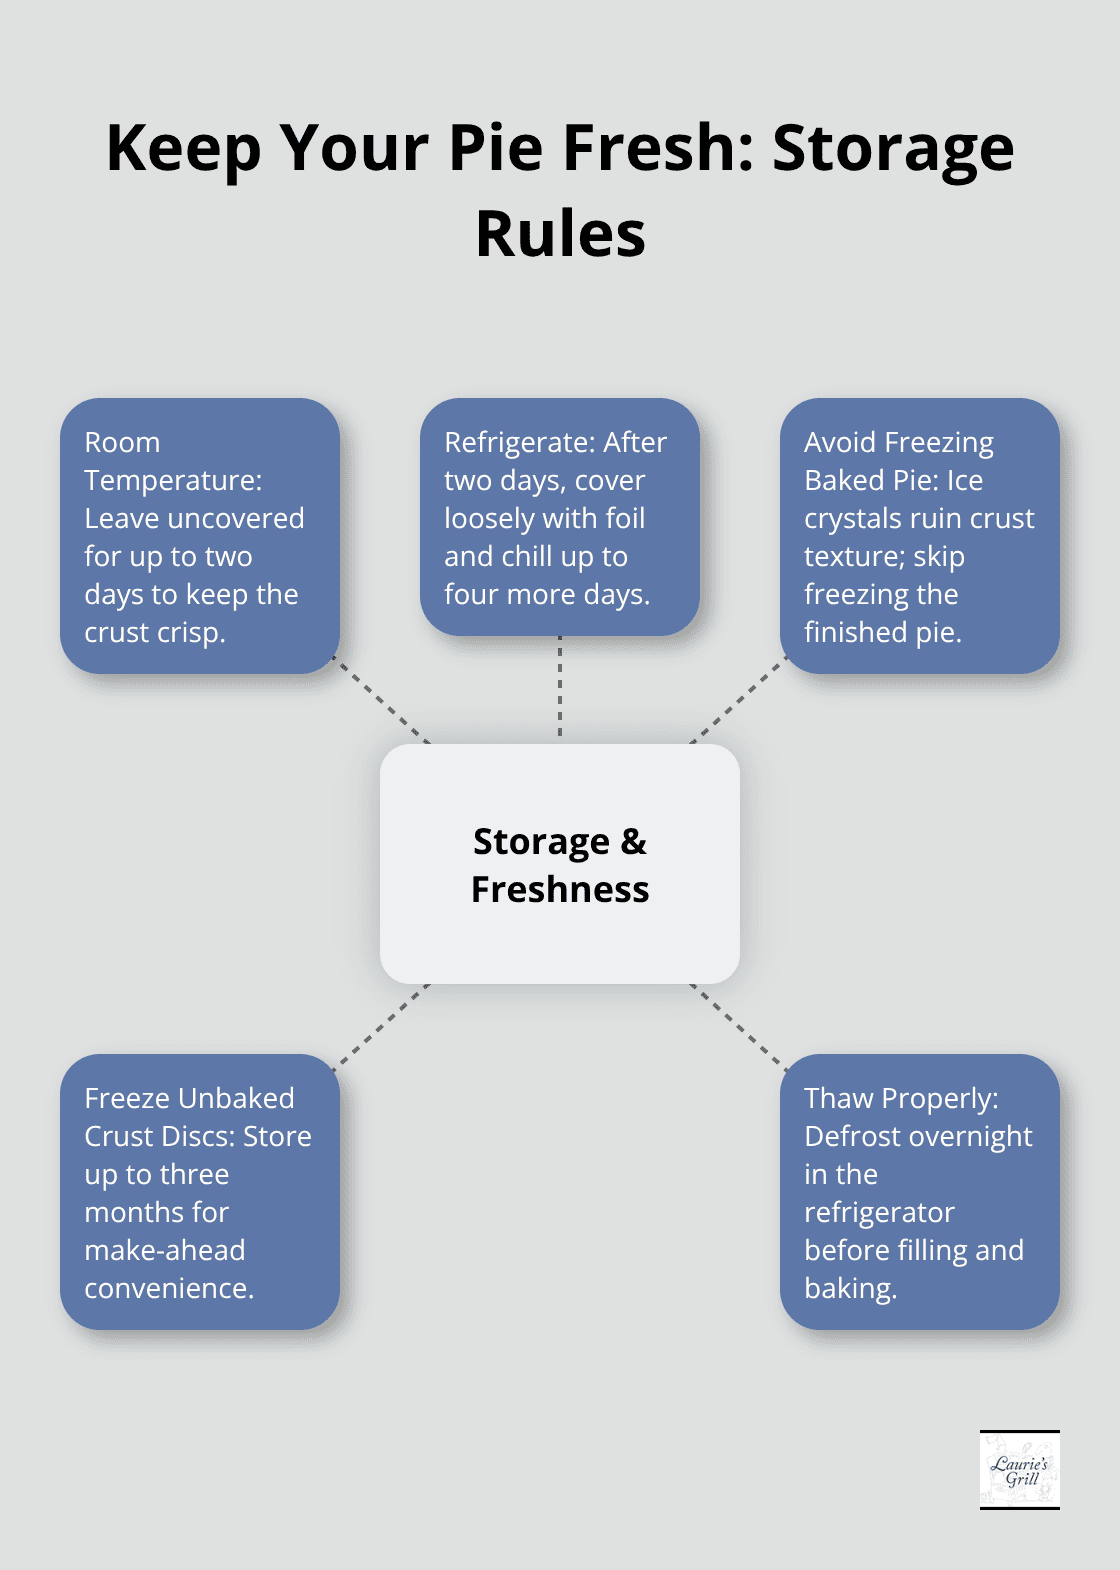
Leave your pie uncovered at room temperature for up to two days, as plastic wrap traps moisture that softens the crust. After two days, cover it loosely with foil and refrigerate for up to four additional days-the cold slows starch breakdown and prevents the filling from weeping. Do not freeze a fully assembled baked pie, as moisture crystallizes and ruins the crust texture. Instead, freeze the unfilled crust discs for up to three months, then thaw overnight in the refrigerator before filling and baking.
Reheating Leftover Slices
Reheat leftover slices in a 350°F oven for five to seven minutes to restore crust crispness and warm the filling through without drying it out. This simple step transforms day-old pie into something that tastes nearly as good as the moment it cooled.
Beverage Pairings That Enhance Flavor
Pair your pie with strong black coffee or unsweetened tea-these beverages cleanse your palate between bites and let the apple and spice flavors resurface rather than building into a one-note sweetness. Apple cider, whether hot or chilled depending on the season, echoes the pie’s flavor profile and reinforces its connection to harvest traditions that made this dessert matter for generations.
Final Thoughts
Making an apple pie from scratch teaches you something that no shortcut can replicate: the value of time, attention, and quality ingredients working together. When you pull that golden crust from the oven and smell the cinnamon and caramelized apples filling your kitchen, you create a moment that your family will want to recreate. Each time you bake it, you learn something new about your oven, your apples, and what works in your kitchen.
Your first apple pie might have a slightly uneven crust or a filling that’s a touch runnier than you hoped, and that’s perfectly fine. Your children or grandchildren will taste the difference between a pie you built yourself and one from a bakery shelf, and they’ll remember standing in the kitchen while you macerated the apples, rolled out the crust, and brushed on that final egg wash. These moments become the stories they tell later, and the recipe becomes yours, shaped by your preferences and your family’s tastes.
We at Laurie’s Grill understand how homemade traditions matter, and we’ve built our restaurant on the same principle: serving food that feels like home, made with care and respect for classic American cooking. Whether you’re baking apple pie in your own kitchen or joining us for breakfast, lunch, or dinner, that commitment to quality and warmth stays the same. Bake your apple pie again next year, teach someone else how to make it, and let it become the dessert people ask for when they know you’re cooking.
Recent Comments